Wednesday, February 27, 2013

Depth of Field

Today is not about a specific shoot it is all about depth of field and how to create it in an image.


 Depth of field often referred to as DOF is the distance between the nearest and farthest objects in a scene or image that appear sharp. So think about it as if the camera were actually your eyes, you can't focus on everything at once, you can switch between focusing on the object closest and an object further away. You can do the same with a camera but at varying degrees. 

DOF is changed by the f-stop,You will often hear this referred to as aperture, this also changes the lightness and darkness of am image so if you aren't using the on camera flash then you will have to make other adjustments. 


A lower f-stop like 4.8 will produce a more intense depth of field. If you notice in the image to the left the silver nail polish is in focus and it gradually makes each nail polish go more and more out of focus. 


The next image is taken with a F-stop of 16.0 notice that the gold nail polish is more in focus than it was in the previous image. 


This image is taken with a f-stop of 32.0 which was all my lens would allow me. Each lens has a different range of f-stops.


I prefer shooting with a lower f-stop so that I have a picture with more depth to it, but there are times I prefer to go to a higher f-stop. When you do any kind of landscape photography you will probably want to opt for a higher f-stop.


Like I said before i prefer to use a lower f-stop to create a focal point like the image above. You can choose which you like better but most cameras on auto will use a lower f-stop so if you aren't 100% sure about going full manual most DSLRs have an option that is "A" which stands for aperture preferred. This setting lets you put the f-stop where you want it and the camera will adjust all the rest of the settings to make you picture look more normal instead of blowing out the image or making it darker. 

I hope this has helped some of you in case you were wondering what the heck I was talking about when I was saying f-stop.

If you have anything you were always wondering how to do you can always request it and I will try my hardest to make it!

Wednesday, February 20, 2013

Night Time with people!

So I was busy this past weekend working with Digital Outburst at GATO Con so I wasn't able to create anything new for you all but i did go back into my files and found something else that I haven't posted about. So I know I've covered night time photography and now we are throwing in people! My model for this shoot was my lovely friend Keara :D.


For this you will need:
-Your camera
-A Flash (I used my SB700)
-A remote flash system (I had borrowed my friends yongnuo)
-A flash stand or something to hold the flash off the camera
-A person to model
-Night time!

First you are going to want to set up your flash for the picture above it was to my left side and I honestly don't know the power that it was on I usually don't mess with the flash once I've figured out a setting that I liked. For the camera settings my f-stop was at 3.5, my shutter was at 1/100 (You are going to have to go lower than normal because it is dark) my ISO Tended to range from 400-500. I messed with the f-stop a but and the shutter but I never went over f 5.6 and shutter 1/160.
This image I wanted to create more shadows so I put the flash on my left and made it further to the side than directly pointing at the model. The camera settings were f-stop 4.8, shutter 1/160, and ISO at 500. The major down side to shooting outside in Corpus at night is the wind. There will usually be a bit of movement but the flash helps freeze them in time more than anything else.

Another fun thing about this shoot was the editing process. Now just to keep things clear I really enjoy the photo-shoot part and I feel that a photographer is one who can take a picture without having the need to take it into Photoshop to make it good. So as an added fun I turned some of the images sepia and black and white. For the image below I was going for a more "old time" feel and I was loving the color of the corset that she was wearing so I brought that through.


This image and the one above happened to be a snapshot that was mostly a test shot and I am in love with both. Yes there are some things I wish weren't happening like the hair in front of her face (Left image) but it works. This image looks just as amazing in color but I feel like it really works in sepia.


This shoot was definitely a fun one to shoot fighting the wind and mosquitoes but I really enjoyed the images that came from it. I do have a couple of shoots that I want to get done to show and hopefully will get to do them soon i am sure you all will love them :D until then.

Wednesday, February 13, 2013

Bokeh!


So you are probably wondering "WTF is bokeh?" yeah its a weird word... Well bokeh is basically the blurred part of an image, like when your taking a picture of someone and the background blurs out, yeah that's basically bokeh. There is another step to it and that's basically the artistic part, usually lights come out round when blurred in the background and that's because your lens is round. So what I'm going to show you is how to manipulate your bokeh.

What you will need is:
-Your camera and lens (I was switching between an 18-55 and a 55-200 I found the 18-55 better only because i was doing this in my room)
-Lights (city or Christmas which is what i used)
-paper
-tape
-scissors or a paper punch but a small one 

Thats it! Yup this is something you can probably go out and do right now. So first what i did was set up my lights, I just hung icicle lights in my room please ignore the yellow duct tape on my window, there's a gigantic crack :

Next I set up my camera, i took my paper and punched a hole in it and fit on my lens. I used painters tape to attach it to the lens. Make sure you zoom your lens before you tape it otherwise you will get it stuck when you try to zoom it in. 

The longer lenses do work better but I was shooting in my room so I wasn't able to back up far enough to make it work. Also longer lenses get you sharper lines. You can also cut your own design which is what I had to do with the star. 


For my camera settings I had my ISO at 350 my f-stop at 5.6 (for the blur) and my shutter at 1/50 so it will catch the light better. You will want to put your camera on manual focus because you wont be able to focus on much and you want it to be out of focus to create the shapes.

Also be careful with how big you make your shape cutout because it can end up like this. Which is pretty cool but not necessarily what we are going for here.


Last you can use this technique with objects in the foreground. Now mine didn't come out like I wanted because like I said I didn't have very much room to work with. So keep in mind you will want a lot of space if you want your shapes to come out completely. But in lieu of Singles Awareness Day I did this little thing :D


Don't be afraid to mix it up and make a kaleidoscope out of your shapes and play with it, or use multi-colored lights which unfortunately I didn't have to try but imagine this baby with multi-colors! 

I hope you have learned something and don't be afraid to try new things! I know I am definitely going to try this in a future shoot! If you have any requests at what you want me to do just let me know, if I don't know how to do it I will definitely learn how! 

Wednesday, February 6, 2013

Color Me Rad!!!!

So todays post isn't necessarily a how to, this past weekend Color Me Rad happened. For those of you who don't know what Color Me Rad is it is a 5k run that has color stations that throw colored cornstarch at you. So essentially you end up a colored mess and it is awesome.


But this is a perfect time to cover outdoor event photography specifically without flash. One thing you want to remember is that the sun creates shadows, and the shadows are hard to illuminate without flash. The upside is that you can use a much faster shutter than if you were using studio lights.

For some closer up shots you can definitely use flash to help like I did in this shot. But when you get to the group shots or wider shotes it is hard to use a flash strong enough to cover everything.


Things like this shot where you have more people in the front and the background. For this image specifically I had my camera set at 125 ISO since the sun was bright in the sky with no clouds at all in front of it, my shutter at 1/250, and my f-stop at 13 yet again it was really bright. It took me a while to get to this point where you can see their faces and the sky isn't totally blown out. it really is a trial and error thing because some days the sun really is brighter than others. this is where my camera stayed most of the time. The one thing that did change more often was my f-stop because being outside the sunlight does fluctuate so you have to be aware of that. If you aren't aware of that your images will be darker in some and lighter in others. So in this case I just changed my f-stop to compensate for the lighting change.


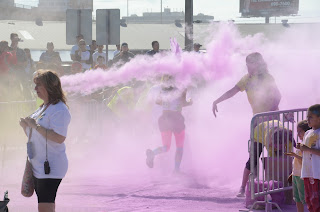
At the very end of the race, thats where I stationed myself the purple color station was the last one the runners went through and as you can tell it was pretty effective there was a purple haze all over.
Last for the final hurrah they did a group color toss. As you crossed the finish line you were given a color packet for the final toss, you could also buy color packets to toss at your friends or whoever. 

Another fun thing they had at the run was fire extinguishers full of color.


These were pretty effective and made for some pretty good pictures. Next year I plan on funning the Color Me Rad run instead of sitting on the sidelines, you should too!